Sharkbite Depth Chart
Sharkbite Depth Chart - No tools are required, and the fittings can be installed in wet lines, even under full flow. Use your sharkbite deburr & gauge tool to measure and mark the insertion depth on your pipe. Web installing sharkbite fittings on copper piping essentially involves only two necessary steps. Follow these three steps to 2 sharkbite product catalog sharkbite Web sharkbite pex is an excellent pipe product for plumbing, radiant and hydronic systems, ofering many more advantages than rigid pipe. Web check the sharkbite insertion depth chart* for the correct depth for your application. For the joint to be assembled correctly, the pipe needs to be pushed into the fitting until it meets the tube stop, which is indicated by the measurement mark. This mark is used to ensure that the joint is assembled correctly. Let’s explore sharkbite fittings in further detail. Web use the sharkbite depth deburr gauge (sold separately) and a permanent marker to mark the insert depth on the outside of the pipe. 2 sharkbite product catalog sharkbite Web check the sharkbite insertion depth chart* for the correct depth for your application. Web sharkbite pex is an excellent pipe product for plumbing, radiant and hydronic systems, ofering many more advantages than rigid pipe. Use your sharkbite deburr & gauge tool to measure and mark the insertion depth on your pipe. You’ll need to cut the pipe to size and push it into the appropriately sized sharkbite fitting. Follow these three steps to For the joint to be assembled correctly, the pipe needs to be pushed into the fitting until it meets the tube stop, which is indicated by the measurement mark. To assemble correctly, the pipe needs to be pushed into the fitting until it meets the tube stop. To assemble correctly, the tubing needs to be pushed into the fitting until it meets the tube stop. Web sharkbite pex is an excellent pipe product for plumbing, radiant and hydronic systems, ofering many more advantages than rigid pipe. Web sharkbite has been at the forefront of innovating solutions that help the plumbing trade work more productively and efficiently. This mark is used to ensure that the joint is assembled correctly. No tools are required, and the fittings. Web use the sharkbite depth deburr gauge (sold separately) and a permanent marker to mark the insert depth on the outside of the pipe. You’ll need to cut the pipe to size and push it into the appropriately sized sharkbite fitting. Use your sharkbite deburr & gauge tool to measure and mark the insertion depth on your pipe. 2 sharkbite. For the joint to be assembled correctly, the pipe needs to be pushed into the fitting until it meets the tube stop, which is indicated by the measurement mark. This mark is used to ensure that the joint is assembled correctly. Web use the sharkbite depth deburr gauge (sold separately) and a permanent marker to mark the insert depth on. Web check the sharkbite insertion depth chart* for the correct depth for your application. Web sharkbite pex is an excellent pipe product for plumbing, radiant and hydronic systems, ofering many more advantages than rigid pipe. Web use the sharkbite ® depth deburr gage (sold separately) and a permanent marker to mark the insert depth on the outside of the tubing.. Web use the sharkbite depth deburr gauge (sold separately) and a permanent marker to mark the insert depth on the outside of the pipe. 2 sharkbite product catalog sharkbite No tools are required, and the fittings can be installed in wet lines, even under full flow. Web use the sharkbite ® depth deburr gage (sold separately) and a permanent marker. This mark is used to ensure that the joint is assembled correctly. No tools are required, and the fittings can be installed in wet lines, even under full flow. For the joint to be assembled correctly, the pipe needs to be pushed into the fitting until it meets the tube stop, which is indicated by the measurement mark. Use your. You’ll need to cut the pipe to size and push it into the appropriately sized sharkbite fitting. Web sharkbite pex is an excellent pipe product for plumbing, radiant and hydronic systems, ofering many more advantages than rigid pipe. This mark is used to ensure that the joint is assembled correctly. Let’s explore sharkbite fittings in further detail. This mark is. Follow these three steps to To assemble correctly, the tubing needs to be pushed into the fitting until it meets the tube stop. Web use the sharkbite ® depth deburr gage (sold separately) and a permanent marker to mark the insert depth on the outside of the tubing. To assemble correctly, the pipe needs to be pushed into the fitting. You’ll need to cut the pipe to size and push it into the appropriately sized sharkbite fitting. Follow these three steps to Web sharkbite pex is an excellent pipe product for plumbing, radiant and hydronic systems, ofering many more advantages than rigid pipe. Use your sharkbite deburr & gauge tool to measure and mark the insertion depth on your pipe.. Web use the sharkbite ® depth deburr gage (sold separately) and a permanent marker to mark the insert depth on the outside of the tubing. To assemble correctly, the tubing needs to be pushed into the fitting until it meets the tube stop. Web installing sharkbite fittings on copper piping essentially involves only two necessary steps. This mark is used. For the joint to be assembled correctly, the pipe needs to be pushed into the fitting until it meets the tube stop, which is indicated by the measurement mark. No tools are required, and the fittings can be installed in wet lines, even under full flow. This mark is used to ensure that the joint is assembled correctly. This mark is used to ensure that the joint is assembled correctly. Web use the sharkbite depth deburr gauge (sold separately) and a permanent marker to mark the insert depth on the outside of the pipe. Use your sharkbite deburr & gauge tool to measure and mark the insertion depth on your pipe. Web sharkbite pex is an excellent pipe product for plumbing, radiant and hydronic systems, ofering many more advantages than rigid pipe. Let’s explore sharkbite fittings in further detail. You’ll need to cut the pipe to size and push it into the appropriately sized sharkbite fitting. Web check the sharkbite insertion depth chart* for the correct depth for your application. 2 sharkbite product catalog sharkbite Web installing sharkbite fittings on copper piping essentially involves only two necessary steps. To assemble correctly, the tubing needs to be pushed into the fitting until it meets the tube stop.
SharkBite Installation Manual
Marking proper insertion depth on pipe when using SharkBite fittings
SharkBite 3/4 in. x 10 ft. White PEX Pipe U870W10 The Home Depot

Sharkbite Depth Chart 1/2

Sharkbite Depth Chart 1/2

Shark Bite Size Chart

Sharkbite Insertion Depth Chart

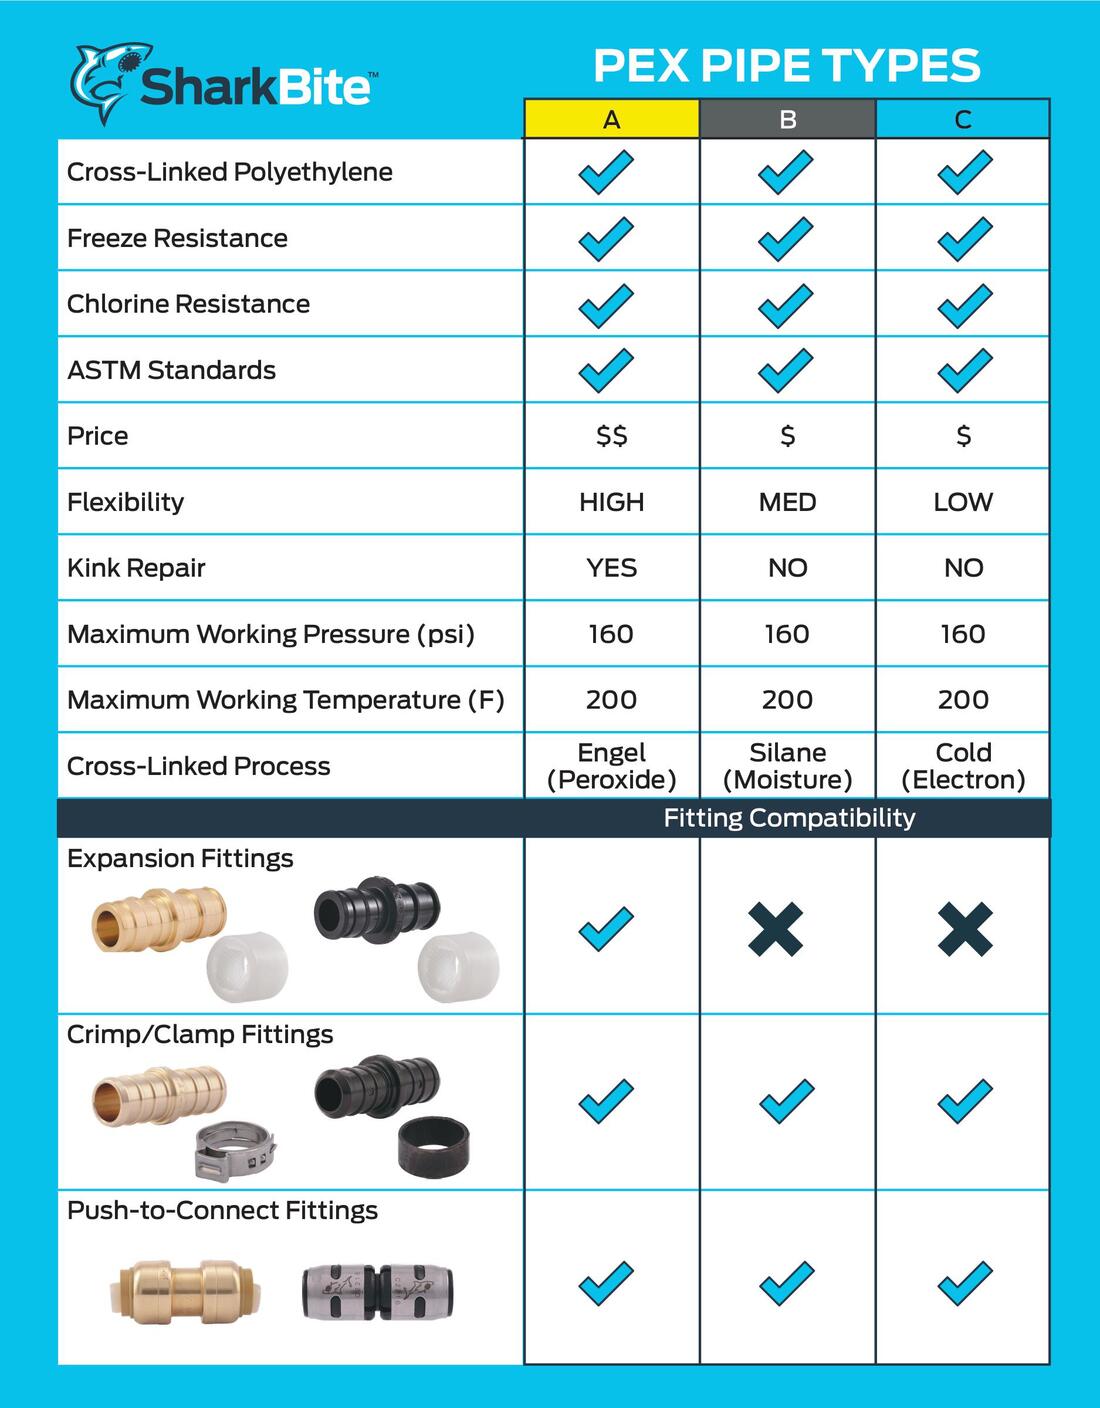
SharkBite Conversion Fittings Chart · CONVERSION FITTINGS CHART Now
Sharkbite Depth Chart 1/2

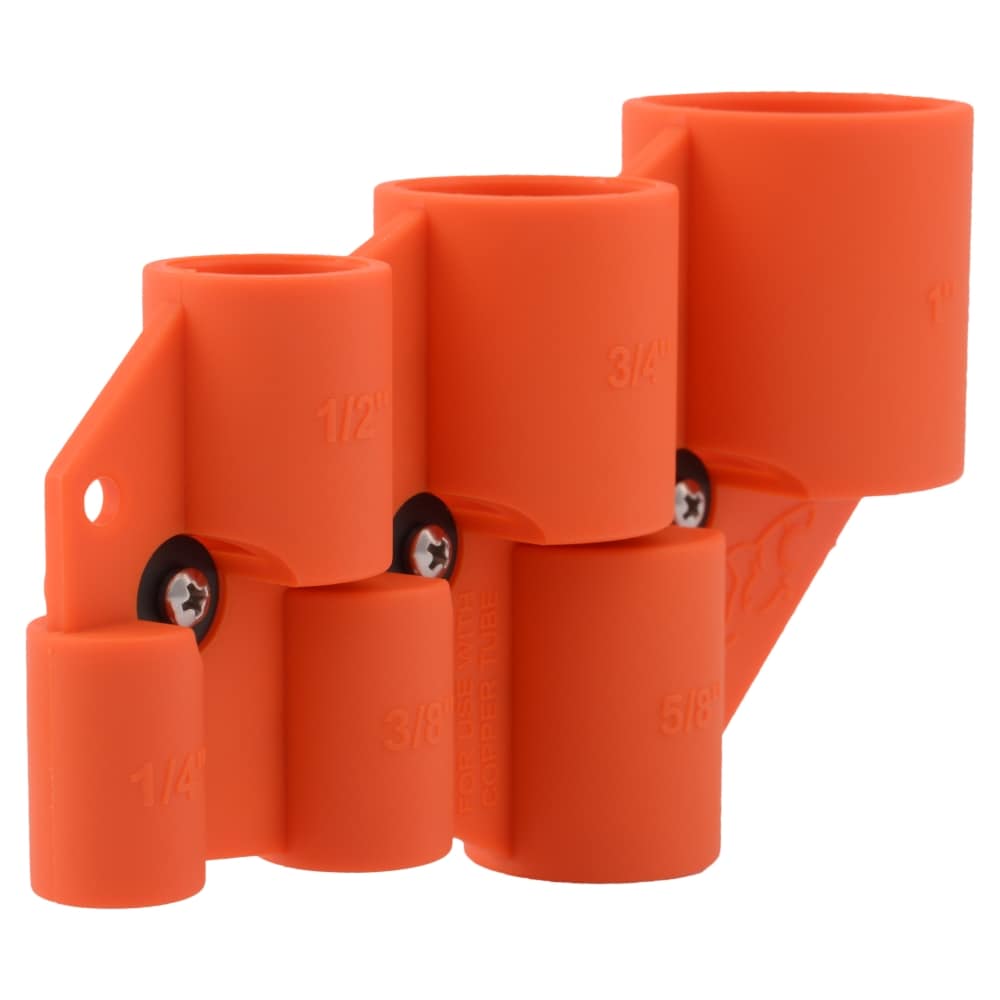
Buy SharkBite 1/4 Inch to 1 Inch Depth Gauge and Pipe Deburring Tool
Web Use The Sharkbite ® Depth Deburr Gage (Sold Separately) And A Permanent Marker To Mark The Insert Depth On The Outside Of The Tubing.
To Assemble Correctly, The Pipe Needs To Be Pushed Into The Fitting Until It Meets The Tube Stop.
Web Sharkbite Has Been At The Forefront Of Innovating Solutions That Help The Plumbing Trade Work More Productively And Efficiently.
Follow These Three Steps To
Related Post:
